

Exterior Painting Preparation
Exterior Painting Preparation: The Complete Guide for NJ Homeowners
A lot of homeowners figure prep is something they could handle themselves. Strip the loose paint, hit it with a hose, call it good. That instinct is understandable. But if you’re hiring a contractor, the preparation phase is where you should be paying attention, because it’s where most jobs either succeed or start to fail. This guide is for homeowners who have already decided to hire a professional and want to understand the work before signing anything. Knowing what good prep looks like helps you ask better questions, recognize a thorough bid, and avoid hiring someone who skips the steps that matter most.
What Exterior Painting Preparation Actually Means
Exterior painting preparation is every step that happens before a brush or roller touches your siding: cleaning, repairing, priming, and protecting surfaces so the paint has something solid to bond to. On a residential home, that means working across wood siding, trim, fascia, soffits, window frames, and possibly decks or porches, each with its own requirements.
Paint forms a mechanical bond with the surface beneath it. If that surface is chalky, dirty, cracked, or wet, the bond fails. You end up with peeling, bubbling, or early fading within the first year. For homes in Middlesex County, preparation isn’t optional. The climate puts exteriors under real stress, and surfaces that aren’t properly prepped won’t survive a full seasonal cycle. Each material has its own requirements, and a contractor who treats them all the same is cutting corners.
The Foundational Principles Behind Good Prep
Surface adhesion is the core principle. Paint needs a clean, stable, properly profiled surface to grip. Bare wood and properly sanded surfaces have good profile. Glossy or chalked surfaces don’t. Primers create that adhesion layer, but they can’t compensate for a dirty or deteriorated substrate.
Moisture control is the second principle. Water is the number one enemy of exterior paint. Wood absorbs and releases moisture as humidity changes, causing expansion and contraction. Paint applied over wet wood will fail at the seams first. A good contractor checks moisture content with a pin or pinless meter before any paint goes on. Wood siding should read below 15 percent moisture before primer is applied. Continuity matters too. A prep job is only as strong as its weakest gap. Caulking every joint, sealing every penetration, and addressing every area of wood rot before paint goes on. Skipping one area creates a water entry point that can undo work on the surrounding surfaces.
The Exterior Prep Process, Step by Step
A thorough exterior preparation process follows a logical sequence. Each step sets up the next one, and skipping steps doesn’t just affect that step. It creates compounding problems further down the line.
Power Washing and Surface Cleaning
Every residential exterior should be washed before any other prep work begins. This removes dirt, mildew, chalked paint residue, and organic growth. On surfaces with visible mildew, a mildewcide solution should be applied during the wash cycle. Painting over active mildew means it continues growing under the new coat, causing early peeling from the inside out. This is one of the most common prep failures we see on homes done by lower-priced crews. Pressure settings matter by surface: wood siding needs 1,200 to 1,500 PSI with a wide fan nozzle, while aluminum needs controlled pressure to prevent denting. After washing, surfaces need 24 to 72 hours to dry before any subsequent work begins.
Inspection and Damage Assessment
After washing, a thorough walk of the property reveals what was hidden under the grime. This is when a contractor should be identifying wood rot, failed caulk joints, cracked siding, deteriorated window glazing compound, and any areas where water is getting in or pooling. We run into this regularly on jobs across Middlesex County. On a split-level in Woodbridge a few years back, the initial walkthrough looked like a routine repaint. Once we washed the house and got eyes on every elevation, we found three sections of fascia board behind the gutters that were soft through their full thickness, completely invisible from the driveway. The homeowner had no idea. Replacing those boards before paint went on added two days to the project, but the alternative was painting over rot that would have failed within a season and caused water intrusion behind the soffit. That kind of discovery is normal on homes more than fifteen years out from their last repaint, which is exactly why we do not price a job without walking every elevation first.
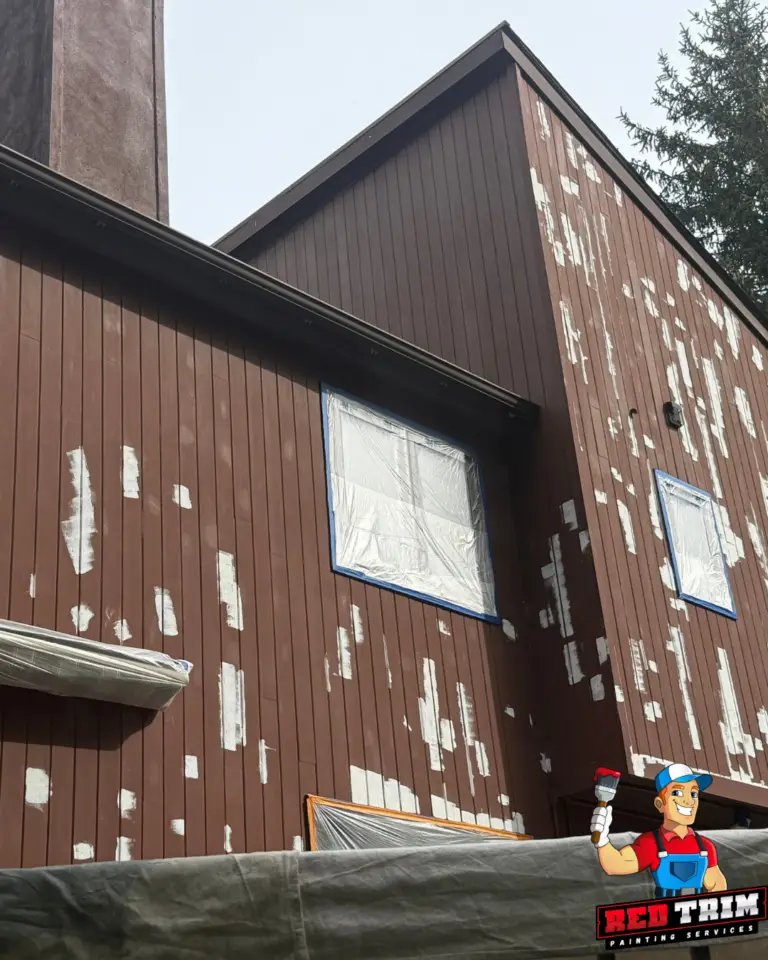
Scraping and Sanding Loose Paint
Any paint that is peeling, bubbling, or no longer bonded to the substrate has to come off. Painting over failed paint doesn’t lock it in place. It adds weight and creates a thicker, more brittle layer that fails faster. Scraping is followed by sanding to feather the edges where old paint meets bare wood, creating a smooth transition that won’t telegraph through the new topcoat. On homes built before 1978, scraping triggers lead paint considerations. Dry sanding or aggressive scraping without proper containment creates hazardous dust, and a professional contractor in NJ should have a clear protocol for this.
Caulking and Surface Sealing
Caulking is one of the most skipped steps on budget paint jobs and one of the most consequential. Every gap where two different materials meet, wood siding to trim, trim to window frame, siding corners, around penetrations like pipes and electrical, needs to be sealed. If those gaps are left open, water gets behind the painted surface and causes failure from the inside out. Caulk type has to match the application: paintable latex caulk for wood and fiber cement, polyurethane at foundation joints and windows where flex is needed. Old caulk should be cut out entirely before new caulk is applied. Laying new over cracked old just delays the same failure by one season.
Wood Rot Repair and Structural Fixes
Rotted wood won’t hold paint and won’t hold fasteners. Repairs range from epoxy wood filler for localized soft spots to full board replacement on badly damaged sections. Fascia boards, window sills, and the bottom courses of lap siding are the most rot-prone areas on NJ homes, particularly on houses that went several years between paint jobs.
Priming
Primer is not just thinned paint. It is a specialized coating engineered for adhesion and sealing. Bare wood, repaired areas, and any spot where original paint was removed to bare substrate all need spot-priming before topcoat goes on. Primer selection depends on what you’re priming over. On bare wood and repaired areas, we use Sherwin-Williams PrepRite ProBlock as a standard exterior primer. On surfaces with tannin bleed from cedar or redwood, or where water stains are present, we step up to Sherwin-Williams Extreme Bond or a shellac-based stain blocker. Standard latex primers will not stop tannin or water stains from bleeding through. On aluminum siding or any glossy surface, Extreme Bond is what we reach for. It is formulated specifically for slick substrates where standard primers fail to grip.
How Prep Differs by Siding Material
Wood lap siding is the most prep-intensive: full washing, scraping, sanding, spot priming, and caulking at every joint. Fiber cement, common on homes renovated in the last 20 years across Middlesex and Somerset County, holds paint well but needs caulking at butt joints and priming at any bare or cut edges. Aluminum doesn’t rot but oxidizes and chalks, so prep shifts to scuff-sanding, chalk removal, and a bonding primer. Stucco requires mildewcide washing, elastomeric crack patching, and often a masonry sealer. Fresh or recently patched stucco is pH-sensitive and needs time to cure before primer goes on.
Common Mistakes on Residential Prep Jobs
The most common prep failure we come across is painting too soon after washing. In NJ’s humid summers, wood surfaces trap moisture that isn’t visible to the eye. Paint over that moisture and you’ll have bubbling within a season. Skipping spot primer is another frequent shortcut. Those spots absorb paint at a different rate, showing up as dull patches or early peeling. Caulking over old caulk, using the wrong caulk type, and failing to caulk all penetrations are the three mistakes that cause the most callbacks. Each creates a freeze-thaw failure point over NJ winters.
On homes where oil-based paint was used historically, the oil-to-latex conversion is its own prep scenario. Oil paint doesn’t bond reliably to standard latex primer in high-moisture conditions. The alcohol-swab test identifies which you’re dealing with: rub a cotton ball soaked in rubbing alcohol on the surface. If paint transfers, it’s latex. If nothing comes off, it’s likely oil-based.
How NJ Climate Affects Exterior Prep
Middlesex County sits in a climate that is genuinely challenging for exterior paint systems. Summers bring high humidity and heat that cause wood siding to expand. Winters bring freeze-thaw cycles where water in any gap expands as it freezes, forcing paint away from the substrate.
Most latex paints require surface temperatures between 50 and 90 degrees Fahrenheit, including overnight after application. High summer humidity extends recoat windows: a 2-hour recoat listed on the can can stretch to 4 to 6 hours when humidity is above 80 percent. Rushing the second coat leads to solvent entrapment, trapped moisture under the film that causes bubbling or wrinkling weeks later.
What Exterior Prep Costs on a Middlesex County Home
Prep work is typically built into the overall project cost. On a standard two-story colonial in Middlesex County in reasonable condition, prep accounts for 60 to 70 percent of the total before paint. A full repaint on a 2,000 to 2,500 square foot home in good condition typically runs $7,500 to $9,500 in this area. Homes with significant peeling, wood rot, or oil-to-latex conversion needs will come in higher, often $8,500 to $9,500 or more. Be cautious about bids well under those ranges. A contractor bidding $2,200 to paint a whole house is not spending two full days on prep, and the savings show up in the paint job before the first winter is over.
Maintenance and Lifecycle Planning After the Job
A properly prepped and painted residential exterior in NJ should last 7 to 10 years before a full repaint is needed. Around year three to five, walk the exterior and look for caulk that has cracked, early peeling, or paint beginning to chalk or fade unevenly. A failed caulk joint at a window frame that costs $60 to address in year four can cause $700 or more in wood damage if left until year seven. Keep records of the paint used: brand, product line, sheen, and color formulas. A thorough contractor provides this at job completion without being asked.
Best Practices for Exterior Prep on Residential Homes
Ask for a written scope of work before any contractor starts. It should specify which surfaces will be washed, what cleaning solutions will be used, what will be scraped and sanded, where caulk will be applied and what type, and which areas will be primed with what product by name.
Every estimate we provide breaks this down line by line. Vague bids that say only “prep and paint” give you no basis for holding anyone accountable. Make sure the contractor is checking moisture levels before priming. We do it on every job with a pin or pinless meter before primer goes on. If your contractor cannot tell you what reading they are looking for, that is a meaningful red flag.
Confirm that caulk is going in before paint. Caulk needs a minimum of 24 hours to cure properly but it can be painted in one or two hours depending on the type of caulk. A crew running caulk and paint in the same areas on the same day is cutting that window short.
Frequently Asked Questions
How long does exterior painting preparation take on a typical home?
On a 2,000 square foot two-story home in average condition, prep typically takes two to four full days before any paint goes on. Homes with significant peeling, wood rot, or extensive caulk failure will take longer. If a contractor says they can prep and paint your whole house in a single day, that should be a serious concern.
How do I know if my siding needs to be replaced before painting?
Siding that is warped, buckled, split through its full thickness, or showing rot deeper than surface-level should be replaced, not painted over. A good contractor will identify these areas during the inspection and show you what they found before the repair scope is finalized.
Does every surface on my house need to be primed before painting?
Not every square inch, but any area scraped to bare wood, repaired with filler or epoxy, or showing staining needs spot-priming before topcoat. Stain-blocking primer is required on areas with water staining or tannin bleed. Standard latex primer won’t stop those from bleeding through.
Can exterior painting be done in New Jersey in the fall?
Yes, but the window gets tight. Most latex paints require surface temperatures above 50 degrees Fahrenheit including overnight, and late October into November is risky in Middlesex County. A contractor pushing to finish in marginal conditions is not doing you any favors.
What should I look for in a contractor’s prep bid?
A thorough bid spells out what surfaces will be washed, what will be scraped and sanded, where caulk will be applied and what type, and which areas will be primed with what product by name. If the bid just says “prepare and paint,” ask for more detail in writing before you sign.
Why is my paint peeling only a year or two after the last job?
Early peeling almost always traces back to prep: painting over surfaces that weren’t fully dry, skipping primer on bare areas, using the wrong primer type, or painting overactive mildew. If your previous job failed quickly, ask detailed questions about prep scope before hiring anyone for the next one.
How do I know if my home has oil-based paint that needs to be addressed before repainting?
Rub a cotton ball soaked in rubbing alcohol on the surface. If paint transfers, it’s latex. If nothing transfers, it’s likely oil-based. Homes built before the 1990s frequently have oil-based paint on trim and siding, and your contractor should be identifying this during the inspection phase.
What is the difference between caulk and spackle on an exterior?
Caulk is a flexible sealant for gaps between two surfaces that expand and move differently. Spackle or epoxy filler is a rigid compound for static cracks within a single material. Using the wrong product in the wrong location leads to failure faster than using no product at all.
Does my contractor need lead paint certification to work on my house?
If your home was built before 1978 and the work disturbs more than 20 square feet of exterior paint, the EPA’s RRP Rule applies and the contractor’s company must be certified. Ask for proof before anyone picks up a scraper. Red Trim Painting Services LLC is EPA RRP certified and carries that documentation on every applicable job.
How do contractors check if wood siding is dry enough to paint?
With a moisture meter, either pin-type or pin-less. We check readings on wood siding before primer or paint goes it every time, and the threshold is below 15 percent moisture content. Above that, paint will trap moisture as it tries to escape, causing bubbling and early adhesion failure.
Find Exterior Painters Near You
Red Trim Painting serves homeowners and businesses across Central NJ. See our exterior painting services in Metuchen, Perth Amboy, Fords, Milltown, and Franklin Park. Get a free estimate.